
Companion — the official OpenIPC configurator
Companion is the official cross-platform application for configuring OpenIPC cameras, built with Avalonia UI. It connects to the device over SSH and gives you a GUI for everything you would otherwise edit by hand in config files: WFB-NG parameters, camera settings, telemetry, presets and firmware.
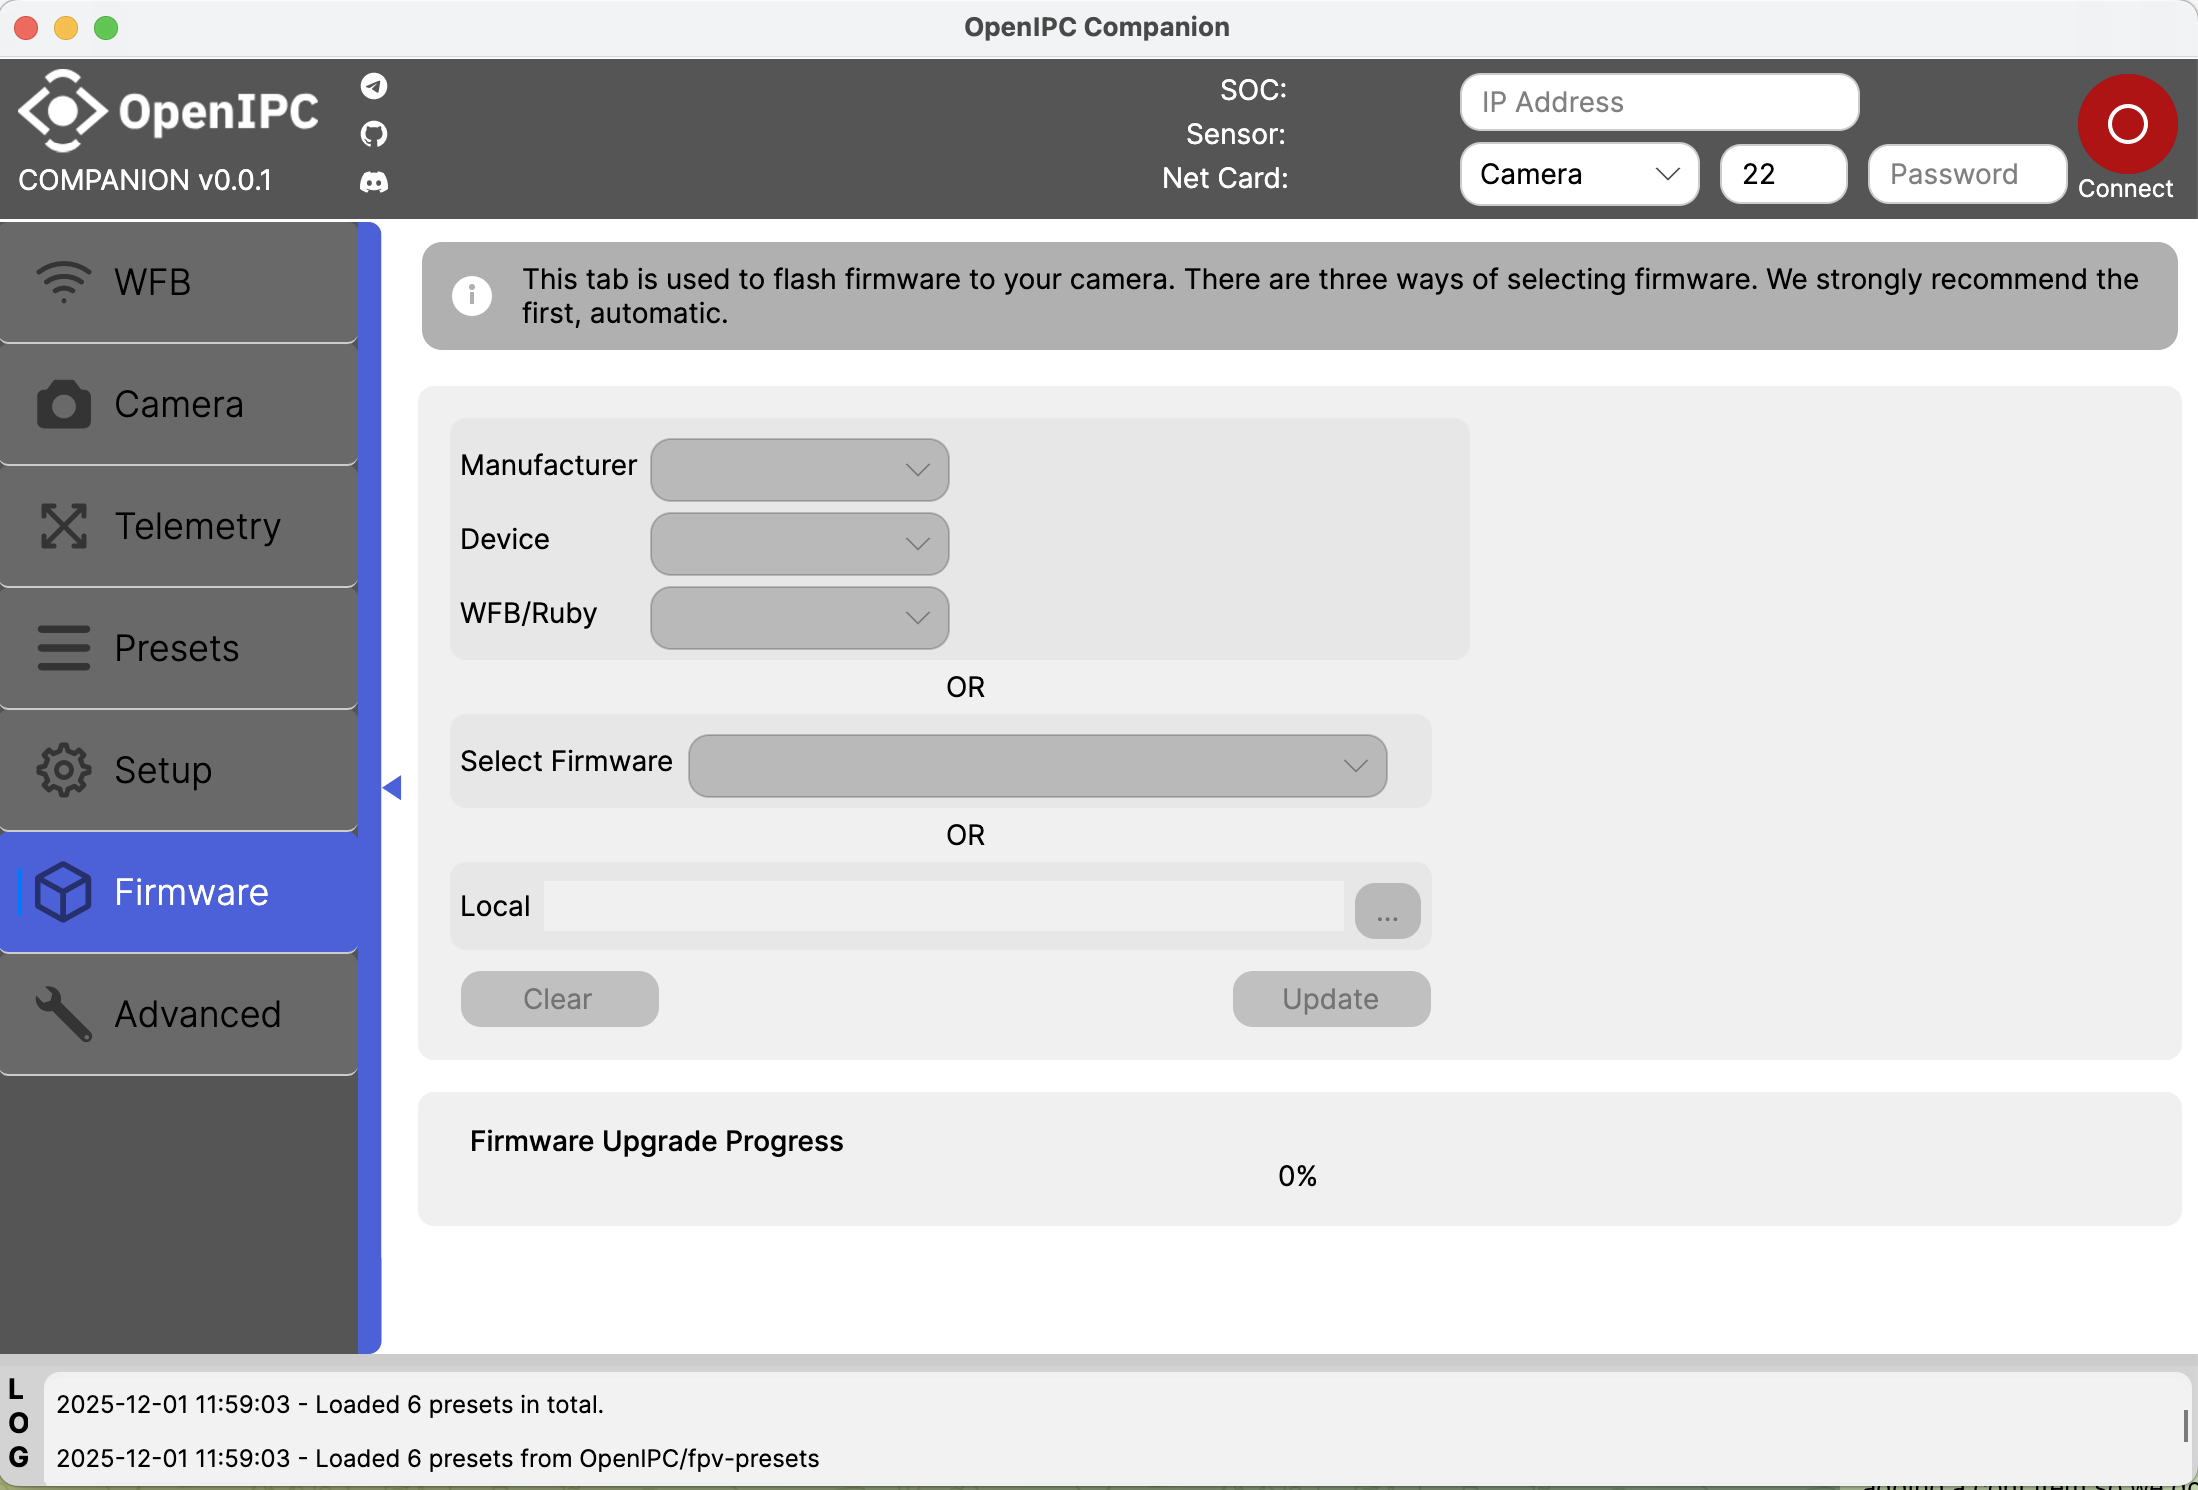
The Companion main window. This screenshot is from an early build — the set of tabs has changed since; see the current list below.
What Companion does:
- Camera settings — resolution, frame rate, exposure
- Telemetry — real-time metrics (temperature, voltage, signal strength)
- Setup wizards — guided device and network configuration
- Presets — save and apply ready-made setting bundles
- Firmware — updates, plus backup and restore
- Cross-platform — Windows, macOS, Linux; Android and iOS builds are in progress
NVR is not supported
Companion does not work with NVRs yet. For NVR support use OpenIPC Config by MarioFPV.
Companion is the "Multiconfigurator"
This is not a separate new app — it is the same official configurator under a new name. It used to be called OpenIPC Config, and the community calls it the "multiconfigurator"; since release v0.7.14 (January 2026) the builds are named Companion-*. The openipc-configurator repository was renamed too, so old links redirect to OpenIPC/companion and open the same releases.
So there is no separate "multiconfigurator" page any more — everything lives here, including the step-by-step camera flashing.
Do not confuse it with OpenIPC Config by MarioFPV — that is a separate tool for NVR and URLLC devices.
What you need
| Component | Requirements |
|---|---|
| Device | A camera running OpenIPC firmware, or a Radxa ground station |
| Network | Computer and device on the same network (Ethernet, Wi-Fi or USB-NCM) |
| Access | Working SSH on the device, known IP and root password |
| OS | Windows, macOS or Linux (x64 or arm64) |
Installation
Prebuilt binaries are available on the Companion releases page. You do not need to build from source — just pick the archive for your system.
| System | File | How to run |
|---|---|---|
| Windows | Companion-windows-x64.zip or Companion-windows-arm64.zip | Extract the archive and run Companion.Desktop.exe |
| macOS | Companion-macos-x64.dmg or Companion-macos-arm64.dmg | Mount the .dmg and drag Companion.app into Applications |
| Linux | Companion-linux-x64.zip or Companion-linux-arm64.zip | Extract and run ./Companion.DesktopApp (chmod +x if needed) |
Which archive to pick
arm64 is for Apple Silicon (M1–M4), Windows on ARM and single-board computers. For regular Intel/AMD desktops and laptops, use x64.
Building from source
If you need the latest master or a platform with no prebuilt archive, you will need the .NET SDK 8.0:
git clone https://github.com/OpenIPC/companion.git
cd companion

dotnet build Companion.Desktop/Companion.Desktop.csproj -c Release
dotnet run --project Companion.Desktop/Companion.Desktop.csprojOn Ubuntu/Debian, install the dependencies with:
sudo apt-get install -y dotnet-sdk-8.0 dotnet-runtime-8.0Android
An Android build exists but is still alpha. Known issue: when working through a tunnel on Radxa the app can hang — the developers link this to a command waiting on a broken connection.
Connecting to a device
Companion works over SSH and always connects as root — there is no username field, only a password.
- Power on the camera (or Radxa) and make sure it is reachable, e.g.
ping 192.168.1.10 - Launch Companion
- Fill in the fields at the top of the window:
- IP Address — the device address (typically
192.168.1.10for a camera) - Port — the SSH port,
22by default - Password — the root password (
12345on stock OpenIPC firmware)
- IP Address — the device address (typically
- Pick the device type with the radio buttons: Camera or Radxa
- Click Connect
Don't know the camera's IP
The app has a built-in network scanner that sweeps the subnet and lists the OpenIPC devices it finds. Used addresses are cached, so next time you can just pick the IP from the list.
Application tabs
Which tabs you get depends on the device type you selected when connecting.
Camera
| Tab | Purpose |
|---|---|
| WFB | WFB-NG parameters: channel, bandwidth, TX power, encryption key |
| Camera | Video settings: resolution, FPS, bitrate, codec, exposure |
| Telemetry | Telemetry and OSD settings: port, UART baud rate, protocol |
| Setup | Device and network setup wizards, maintenance operations |
| Firmware | Firmware updates, backup and restore |
| Preferences | Settings for the app itself |
Radxa (ground station)
| Tab | Purpose |
|---|---|
| WFB | WFB-NG parameters on the ground station side |
| Setup | Ground station setup wizard |
| Preferences | App settings |
Firmware Focused Mode
In Preferences you can enable Firmware Focused Mode — this hides every tab except Firmware and Preferences. Handy when you only use Companion as a flashing tool.
Below the main window there is a log panel you can drag open by the splitter. It shows the actual SSH commands and errors, so it is the first place to look whenever something goes wrong.
Flashing a camera
The most common reason to open the configurator.
If you only need a settings reset
When you do not need a firmware update but only a full factory reset, run the firstboot command on the device (over SSH or in a terminal). It restores factory settings without reinstalling the firmware.
- Make sure you have a stable connection to the device (Air Unit) — see Connecting to a device above
- Open the Firmware tab and select your device — manufacturer, model and firmware type
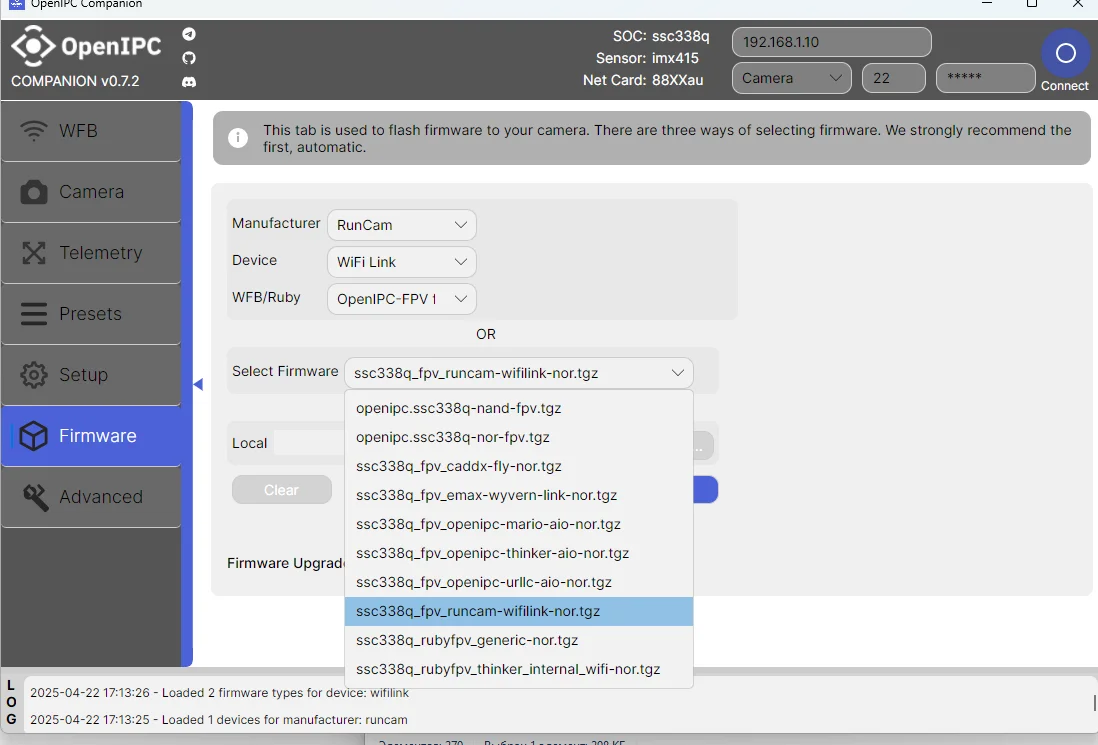
The Firmware tab (screenshot from v0.7.2). There are three ways to pick firmware — automatically by manufacturer and model (recommended), from the image list, or from a local file.
Warning!
Always check the drone's power supply quality before starting the flash process!
If power is cut during flashing you may brick your device.
Wait a few minutes until a ping to the device appears (the blue Connect button in the configurator)
If no connection appears within 5 minutes — the device did not flash. Proceed to the recovery guide: General UART Flashing Guide
Back up before flashing
A backup of the stock firmware takes a few minutes and saves you from most failed experiments.
Presets
A preset is a ready-made bundle of settings (channel, TX power, camera parameters) applied in one click. The official collection lives in the OpenIPC/fpv-presets repository.
The Presets tab is temporarily hidden
Up to v0.7.15 presets had their own tab (you can still see it in screenshots of older builds), but it was hidden in January 2026: the preset mechanism is being redesigned and the format and behaviour will still change. In current releases you cannot apply a preset from the app — the format below is documented for the future.
Each preset is a self-contained folder with a preset-config.yaml file:
name: "High Power FPV"
author: "OpenIPC"
description: "Optimized settings for high-power FPV."
sensor: "milos-sensor.bin"
files:
  wfb.yaml:
    wireless.txpower: "30"
    wireless.channel: "161"
  majestic.yaml:
    fpv.enabled: "true"
system.logLevel: "info"What it defines:
- Metadata —
name,author,description,category files— which files on the device to change and which keys to overwrite in themsensor— an optional sensor binary to transfer to the device
Preset folder structure:
presets/
├── high_power_fpv/
│   ├── preset-config.yaml
│   ├── sensor/
│ └── milos-sensor.binThe mechanism: the app scans the presets/ directory, parses each preset-config.yaml and builds from it the list of modifications to apply to the device. To contribute your own preset, submit a pull request to fpv-presets.
Firmware backup
This is Companion's most valuable feature: before experimenting with anything, take a full dump of the camera's flash.
On the Firmware tab, expand Backup / Restore and start a backup. The app will:
- Kill the streamer and other large processes to free RAM
- Dump every
/dev/mtdblock*partition usingdd - Generate MD5 checksums for every
.binfile - Package it all into a
.tar.gzarchive and download it to your machine
Inside the archive:
backup-<chiptype>-<timestamp>/
  mtdblock0.bin   # bootloader (U-Boot)
  mtdblock1.bin   # bootloader environment
  mtdblock2.bin   # kernel
  mtdblock3.bin   # rootfs
  mtdblock4.bin   # rootfs_data (user settings)
md5sums.txt # checksumsPartition names and count vary by SoC. The rootfs_data partition holds your settings — restoring it overwrites anything you changed after the backup was made.
Partition reference
| Partition | Device node | Contents |
|---|---|---|
| boot | /dev/mtd0 | U-Boot bootloader |
| env | /dev/mtd1 | U-Boot environment variables |
| kernel | /dev/mtd2 | Linux kernel (uImage) |
| rootfs | /dev/mtd3 | Root filesystem (SquashFS) |
| rootfs_data | /dev/mtd4 | Overlay with user config |
Layout and numbering vary by SoC and vendor. Always verify against /proc/mtd on your specific device before flashing.
Firmware restore
Destructive operation
Restoring firmware is an irreversible operation. Flashing incorrect data or losing power mid-flash can permanently brick your device. Proceed only if you understand the risks and have a verified backup.
With Companion (recommended)
This works as long as the device still boots and is reachable over SSH.
- Open the Firmware tab → Backup / Restore
- Check "I accept the risk of permanently bricking this device"
- Click Restore from Backup and select your
.tar.gzarchive - Confirm the warning dialog
The app then extracts the archive, verifies the MD5 checksums locally, reads /proc/mtd from the device to confirm the partition layout, uploads and flashcps each partition in order, and reboots the device. If checksum verification fails, the restore is aborted before anything is written to the device.
Manually over SSH
If you cannot use the app but the device is still SSH-accessible:
# 1. Extract the backup archive
tar -xzf backup-<chiptype>-<timestamp>.tar.gz
cd backup-<chiptype>-<timestamp>

# 2. Verify checksums
md5sum -c md5sums.txt

# 3. Copy partitions to the device
scp mtdblock*.bin root@<device-ip>:/tmp/

# 4. Flash each partition
ssh root@<device-ip>

flashcp -v /tmp/mtdblock0.bin /dev/mtd0   # bootloader
flashcp -v /tmp/mtdblock1.bin /dev/mtd1   # env
flashcp -v /tmp/mtdblock2.bin /dev/mtd2   # kernel
flashcp -v /tmp/mtdblock3.bin /dev/mtd3   # rootfs
flashcp -v /tmp/mtdblock4.bin /dev/mtd4   # rootfs_data

rebootflashcp only
flashcp erases and writes atomically. Do not use dd to write back to MTD partitions — it does not erase first. Match the partition numbers to your device's actual /proc/mtd layout.
To flash only the kernel and rootfs, leaving the bootloader and settings intact:
flashcp -v /tmp/mtdblock2.bin /dev/mtd2
flashcp -v /tmp/mtdblock3.bin /dev/mtd3
rebootIf the device won't boot
When the kernel or rootfs is corrupted and Linux cannot start, hardware routes remain:
- Via U-Boot and TFTP — requires a UART adapter and a TFTP server. Flash addresses and partition sizes depend on your exact SoC, so follow the general UART flashing guide.
- From an SD card — on SigmaStar and Ingenic the bootloader initialises the SD card itself and looks for a
boot.scrscript on it, so recovery is possible without UART. - Corrupted bootloader (mtd0) — the device produces no serial output and cannot be recovered in software. You need a hardware programmer (e.g. CH341A) wired directly to the SPI NOR chip.
Config files and logs
The app stores its own settings in appsettings.json — update checks, logging, device hostname mappings and preset repositories are configured there.
| System | appsettings.json | Logs |
|---|---|---|
| Windows | %APPDATA%\Local\Companion\appsettings.json | %APPDATA%\Local\Companion\Logs |
| macOS | $HOME/Library/Application Support/Companion/appsettings.json | $HOME/Library/Application Support/Companion/Logs |
| Linux | ~/.config/appsettings.json | ~/.config/companion.log |
| Android | — | /data/user/0/org.openipc.Companion/files/.config/companion.log |
Logging is configured through Serilog — see the configuration reference.
Troubleshooting
Hostname error when connecting
Companion identifies the device type by its hostname. If yours is not on the list, add it to the DeviceHostnameMapping section of appsettings.json:
"DeviceHostnameMapping": {
  "Camera": [
    "openipc-ssc338q",
    "openipc-ssc30kq"
  ],
  "Radxa": [
    "radxa",
    "raspberrypi"
  ],
  "NVR": [
    "openipc-hi3536dv100"
  ]
}Won't connect at all
- ✅ The device responds to ping from your computer
- ✅ The IP and port are correct (
22by default) - ✅ The root password is correct (
12345on stock firmware) - ✅ The right device type is selected (Camera / Radxa)
- ✅ Check the log panel at the bottom of the window — the SSH error text will be there
macOS won't launch the app
Update to the latest release: v0.9.4 fixed startup of the signed app on macOS by adding .NET entitlements.
Android hangs
A known issue in the alpha build when working through a tunnel on Radxa. Use the desktop version for now.
Useful links
- Companion on GitHub — source, issues, documentation
- Companion releases — prebuilt binaries for all platforms
- Demo on YouTube — a walkthrough of the app
- fpv-presets — the official preset collection
- Flashing via UART — recovering a device that won't boot
- Firmware update (sysupgrade) — the same thing by hand from the terminal
- WFB-NG configuration — what the WFB tab parameters actually change