Installing Adaptive-Link for OpenIPC
What is Adaptive-Link?
Adaptive-Link is a system that automatically adjusts video and link quality between the drone and the ground station based on signal strength.
When you are close — video is clear and smooth. When far away — quality decreases, but the link remains stable.
Info
In other words, you no longer need to manually set transmit power!
How It Works
Adaptive-Link automatically controls:
- Bitrate
- Transmitter power
- MCS, SNR, RSSI parameters
- FEC and QoS depending on distance and conditions
Installing Adaptive-Link on Radxa GS
- Image v1.9.9 or newer → disable Wi-Fi card power.
- Reboot Radxa and log in as
radxa/radxaorroot/root. - Run
nmtui— connect to your home Wi-Fi. - SSH → run:
sudo curl -L -o alink_install.sh https://raw.githubusercontent.com/OpenIPC/adaptive-link/refs/heads/main/alink_install.sh
sudo chmod +x alink_install.sh
sudo ./alink_install.sh gs remove
sudo ./alink_install.sh gs installWait for the update to finish. Reboot the VRX.
Installing Adaptive-Link on Runcam WiFiLink V1/V2 Cameras
- Download Multiconfigurator.
- Extract and launch it.
- Connect to the camera at
192.168.1.10(password12345). - Click Connect (turns blue when camera is reachable); after connecting the camera type, sensor and Wi-Fi card are detected.
- Go to Firmware → Runcam → Wifilink → fpv and click Update.
- After the update:
Open Telemetry → enable UART0, add Mavlink.
Enable Alink Drone → Enable.
After the camera connects to the Radxa you should see this window: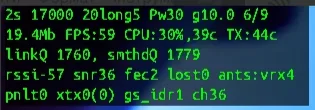
Warning!
If it doesn't appear — adaptive_link is NOT working.
Edit the configuration file on the Air Unit — only a few values matter:
/etc/alink.confHere you set whether RSSI or SNR takes priority:
snr
rssi_weight=0,5
snr_weight=0,5
osd_level=5osd_level controls how many lines of info Adaptive-Link displays (bitrate, CPU load, etc.) — range 0–5.
Force-Enabling Adaptive Link
- Open WinSCP.
- Connect to the camera via FTP/SSH.
- Open
/etc/rc.localand insert beforeexit:
alink_drone &- To overclock the CPU (optional): open
/etc/rc.localand add:
echo performance > /sys/devices/system/cpu/cpu0/cpufreq/scaling_governor
echo 1200000 > /sys/devices/system/cpu/cpu0/cpufreq/policy0/scaling_min_freq
echo 1200000 > /sys/devices/system/cpu/cpu0/cpufreq/policy0/scaling_max_freqNote!
Warning: some cameras may behave unstably with overclocking — test on the bench first!
Safe TX Profiles
txprofile files for network cards — here (filename must always be txprofile.conf)
Example safe TX profile:
# <range> <gi> <mcs> <fecK> <fecN> <bitrate> <gop> <Pwr> <roiQP> <bandwidth> <qpDelta>
999 - 999   long 0 8 12 1999 10 30 0,0,0,0 20 -12
1000 - 1050 long 0 8 12 2000 10 30 0,0,0,0 20 -12
1051 - 1500 long 1 8 12 4000 10 25 0,0,0,0 20 -12
1501 - 1950 long 2 8 12 8000 10 20 12,6,6,12 20 -12
1951 - 2001 short 2 8 12 9000 10 20 12,6,6,12 20 -12TX File Parameters
- range — range for adaptive transmission.
- gi — guard interval.
- mcs — modulation and coding scheme.
- fecK — number of data symbols in FEC.
- fecN — total number of symbols in FEC.
- bitrate — data transmission rate (bits/s).
- gop — keyframe interval.
- Pwr — transmitter power level.
- roiQP — quantisation for region of interest.
- bandwidth — channel bandwidth.
- qpDelta — corrective QP difference.